Very cool.
My Final System Build in Words & Pictures
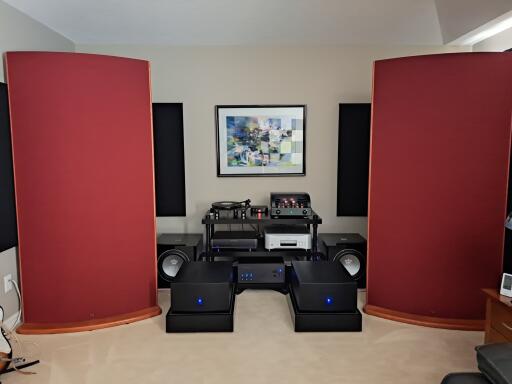
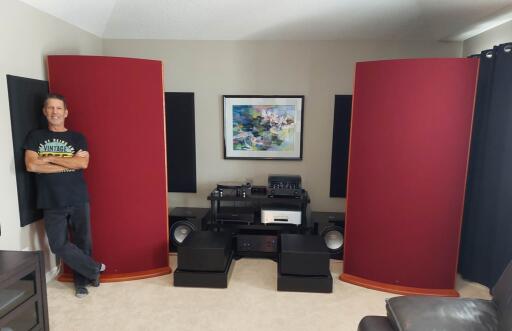
A few years ago, after 25 years with the same system, I embarked on the journey of building what will be my last stereo system. When Covid hit, with all that time at home, I cycled through a lot of equipment. Mostly buying used and selling on after deciding what worked and what didn't. It's a shame we can't keep everything as there's so much to love about different pieces of stereo gear. But the system is finished and for those who are interested, here it is. At age 68, this is my last build. I am well aware the room is a bit small but even so, the sound is beautiful. I hope to build one final house and there will be a bigger entertainment room at that time.
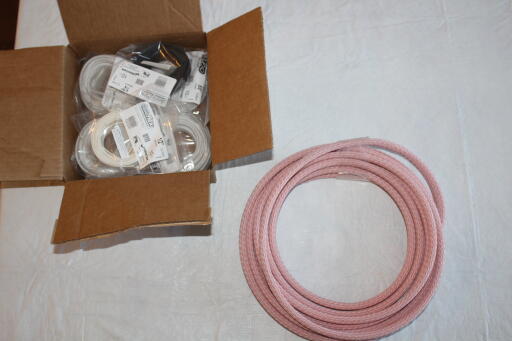
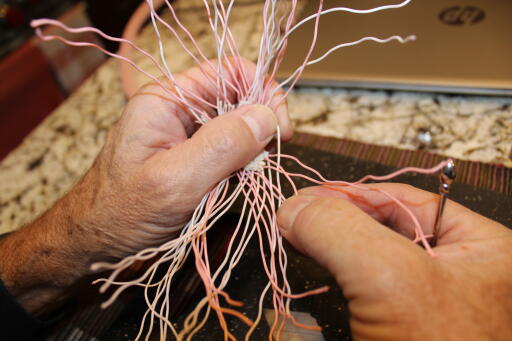
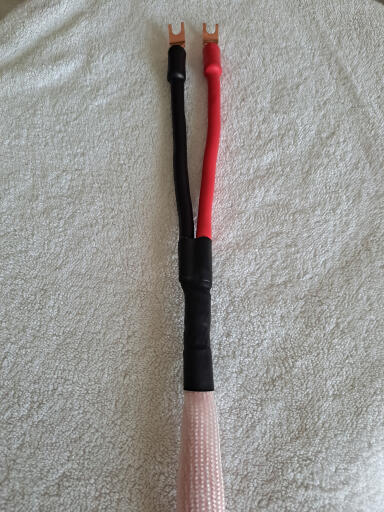
Being somewhat of a hands on person, I have tried to build what I could as opposed to buying. That process started with two 8 foot sets of speaker cables. I used the CHeLA OCC Cable from VH Audio, and sourced the Spade connectors, shrink tube and braided sleave from AV Outlet.

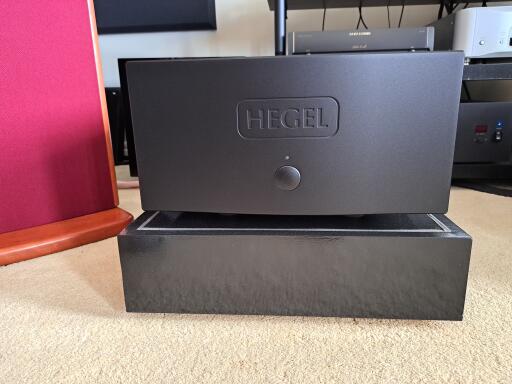
I elected to power the system with a pair of HEGEL H30 mono blocks. The term mono is a bit of a misnomer as these amps have the option of running in mono mode at 1125 watts or in Stereo mode at 450 watts x 2 per amp. I am currently using them in stereo mode and bi-amping my speakers using one amp as LL and the other amp as RR. Hence the 2 pairs of speaker cables. The amps were sourced from EVEREST AUDIO INC. in Regina Saskatchewan. I have dealt with Neil Gelowitz at Everest for a few years and have found his service and expertise to be invaluable. Thanks Neil.
I also have a set of Silversmith Fidelium cables which I like very much. Will be interested to switch then in and go over to mono mode. Will there be a noticeable sound difference? We will see. I have about 4 different configurations that I can choose. Should be fun.
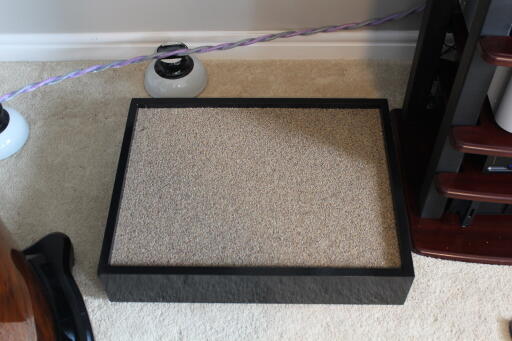
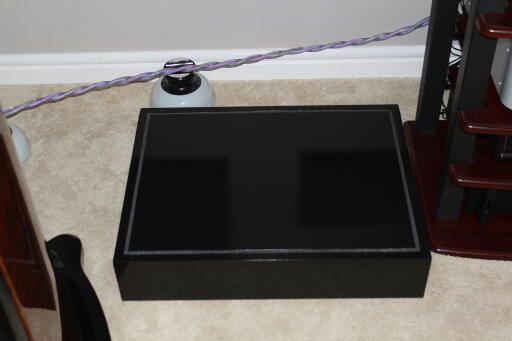
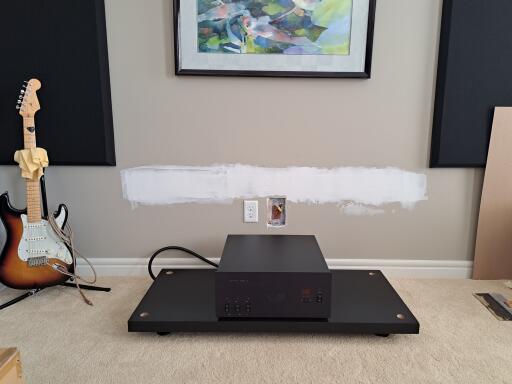
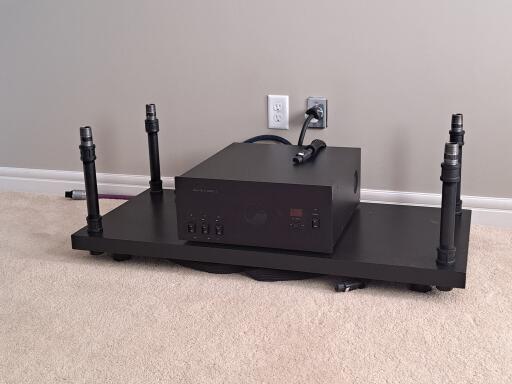
Wanting to mount the amps on some sort of anti vibration platform, and finding the price of pre made systems to be ridiculous (IMHO), I was intrigued by the old school design of using sand as a medium for vibration control. My platforms are build from 3/4" MDF with a bit of bracing and each filled with 100 pounds of dry sand. The top panel is free floating. Material sourced from Home Depot for a total cost of $75 per platform.

I chose the PrimaLuna EVO 400 Pre Amp, sourced from Daniel Kuburovski at VINYL SOUND in Toronto, Ontario. Great price and speedy delivery.
I then chose the Esoteric K-01XD SACD unit. This was sourced from ELEMENT ACCOUSTICS in Richmond, British Columbia. My rep, Allen Li, worked with me over several months. We started with a K-03 unit that had a minor operational defect. Both Allen and the American Esoteric importer were superb in their customer service and attention to my concerns. In the end I upgraded to the K-01 and couldn't be happier. A lot of moving parts to arrive at the final unit and all handled by Allen. In the end, the K-01 landed at 25% below suggested list.
My TT is a Rega P8 with Apheta 3 cartridge, sourced from Karl Motz at Classic Sound in Chilliwack British Columbia. I also purchase a pair of REL S/812 Subs from Karl. Once again, great attention to customer needs and a price that beat all other retailers by a good amount. Thank you Karl.
I matched the Rega with a Parasound JC3+ preamp sourced from Parts Connection in Burlington, Ontario.
I spent a lot of time considering power options and was leaning towards the P20 Powerplant from PS Audio. My concern was the upper limit on 20 amps, which is arguably sufficient, but I landed on the Equitech 5RQ step down transformer. In the same ball park cost as the P20, the 5RQ takes 240 volt power, directly at the wall outlet, and steps it down to fully balanced 120 volt, feeding two dedicated 20 amp outlets + 7 additional duplex outlets, two of which are filtered. The 5RQ delivers a constant 40 amp draw capability. The only problem with the 5RQ is the weight. At 175 pounds, you only want to move it once. Luckily I ran a dedicated 10 AWG wire to the wall outlet some time ago so switching over to 240V was simply a matter of installing a duplex 30 Amp breaker in my main panel and changing the wall outlet. This system uses two 120V hot wires + the ground. No neutral wire is used.
As Equitech does not have a Canadian distributor, I dealt directly with Terry Brent, National Sales Director. Terry was very keen to see his product in a Canadian home and did everything possible to make the sale happen. Thanks again Terry. It was a pleasure working with you.

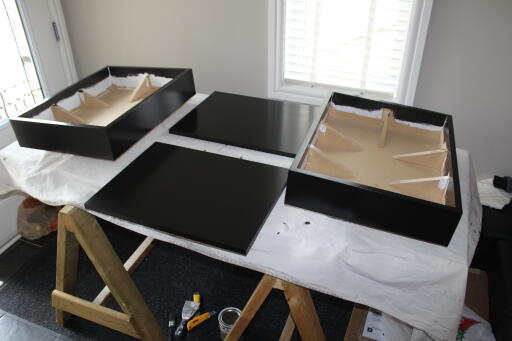
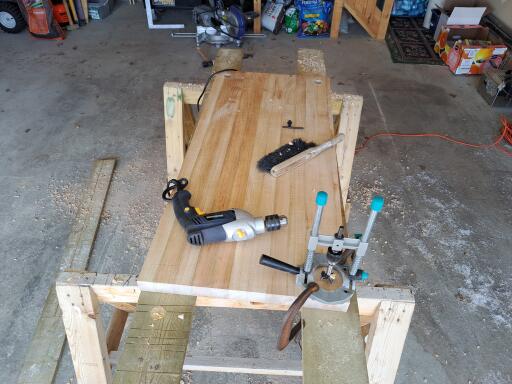
Now I needed to reconfigure my front end equipment as my existing stereo rack was too small. Again, the prices online for shelving systems are crazy (IMHO). So I built my own. Starting with 96" x 30" x 1.75" solid maple butcherblock, sourced from Global Industrial at a price that was unbeatable, I ripped the blanks down to the desired dimensions of 44" x 20". Then I bored 1 5/16" holes in the four corners.
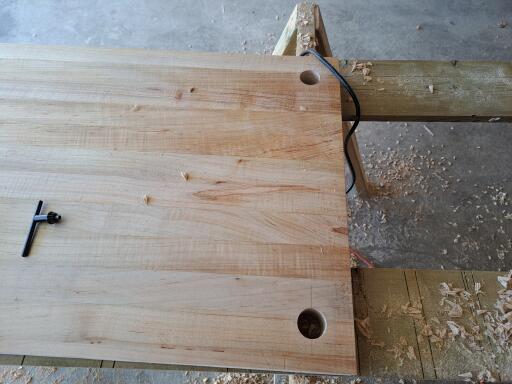
The supports between the three shelves were made of 8" x 1" Black Nipple Pipe with 1" Couplings on each end. These were pre assembled and Powder Coated Black by IMPACT COATINGS in Edmonton, Alberta. Thanks Wendy Miller for getting my parts completed the same week when I know you were working on a three week waiting time. Assembling the rack in place was required due the the weight. The finished rack weighs about 200 pounds and I needing to get the 5RQ in placed from the beginning.
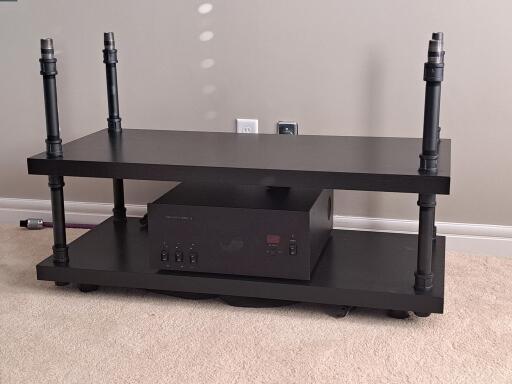

The total cost for my new rack was $1300 CDN.
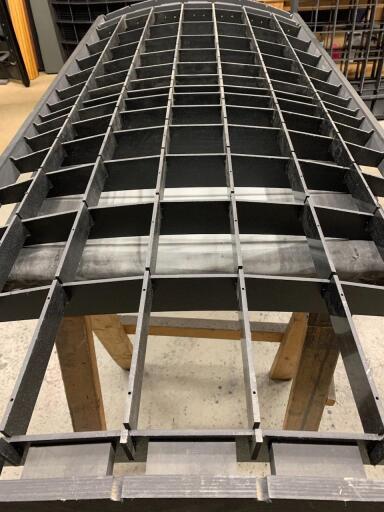
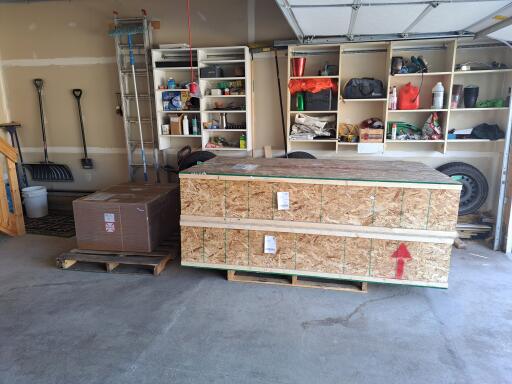
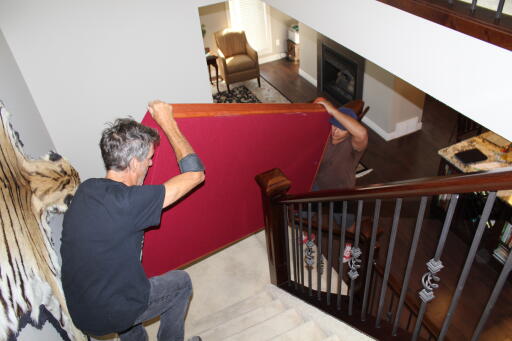
The final component were the speakers. These are a pair of SoundLab Majestic 745 panels. The time from order to delivery was about 5 months and both Connie & Roger West were terrific to deal with. Connie kept me informed of the build progress and sent me photos my my own speakers being build.
The bulk of my cables were sourced from Morrow Audio. Again, a great company to deal with. I purchased everything during their biggest sale of the year (Black Friday) when they were offering 65% off list. It was way ahead of the time I needed them so they agreed to complete the discounted sale and delayed the build to suit my schedule. Nice Folks.
My Power Cables are Puritan Ultimate, sourced from Stuart MacKenzie at MacKenzie HiFi in England. A long way to go for cables but he beat my local retailer by 17%. I like to shop local but refuse to pay for the privilege.
So there it is. I'm sure I have I left something or someone out. Here's the finished product.
Hope some of you enjoy reading this as much as I have enjoyed posting it.
And just one more thing. This one is just for you @thyname 🤣
| Post removed |
@bigtwin : no more Bose? Just kidding .... 😁 Thanks for sharing your journey. Outstanding work! I hope you enjoy your new system for years to come. |
Love the floating panels in sand! Hope you don’t mind if I copy that idea :) Ive built sand filled boxes to put under some of my components, but they are sealed boxes. The floating panels in sand are intriguing. Wonder if using silicone to “close” the gap would maintain the floating of the panel, while keeping the sand from spilling? Thank you for sharing this! |
@perkri My understand of the concept is to keep the top isolated from from the sides. I have left a 3/8" gap on all sides and then attached a 1/4" strip of self adhesive foam weather stripping. Keeps the sand in place but maintains the "float". Also allow the top to be removed at any time. Cheers. |
You don't look over 20 - your system is bigger than my house. What an accomplishment. It is important to realise that at your age and time on the planet well we (I am 67) are on the downside of the bell shaped curve. I watched my mother pass on to another world and her final words were, "enjoy your life, spend your money and be happy." My friend you have done so with grace. Good health. |
What phono cartridge(s) did you settle on? Did you carry anything over, beside the 10 ga power cord? I've had my Kenwood KD 550 on the 1950's style "sand box" since I bought it new. The boxes have been made out of plywood, 2-by-6, and now scavenged walnut from a friend's project. I use it mostly for level, but the vibration damping is great on my suspended floor). I've tried various platforms over the sand, plywood, aluminum plate, butcher block cutting board,MDF and am now using a home made swirled polystyrene 'block' from my recycling experiment. If I make another Plexiglass and colored sand. Seeing your system makes me wonder... if I'd worked hard and played less....... btw I'm 68 ;) |
@bigtwin Nicely done! Thanks for the excellent post. |
Beautiful system! Love how you invested your time and skills in making parts of it. When you do something like this and or restore components you have an investment in your system that you can’t match otherwise. I’ve done this over the albeit not to your level, with my systems and it brings great satisfaction. I think all audiophiles should do this to some degree. Great work! |
Your story is for the most part identical to mine and I am happy to see another out there that doesn't mind a little work for the best possible results. I did the braded speaker cables about 15 years ago when you had to do your own braiding and they didn't have OCC CAT5e wire handy and just recently upgraded those to Cardas 101 wire. Not much difference (Speck wise) but much less bulky and far more manageable. The Equitech 5RQ looks so much like my DIY unit it makes me wonder. But in reality mine doesn't have the internals that the Equitech 5RQ has. I constantly encourage people to get more hands on with their system build. The satisfaction really weighs in, in the end. |
@bigtwin Dude, you win ... Lol. I'm sure there's some rich mother with real deep pockets in our community that has a system that achieves a sound on par with what you have because he (or she) was able to shell out the dough ... but the creative energy you put into building, (and I mean building, in your case) your system has truly got to be almost as big of a payoff as the sound you're getting. So cool that you gave props to the folks that were instrumental in helping you pull it off. It sounds like you're a real nice guy to work with, evidenced by the level of service they all gave you. I can only imagine how cool it was to receive the pictures of your speakers in the various stages of being built. What stellar service that was. Thanks for sharing such a cool post. I'm kind of a do it yourself guy too, and even call myself a wanna be woodworker (Lol) but I would never bite off a project that big. Way to go, man! |
Incredible!! You are master at your craft, or should I say "crafts". You are a visionary, designer, a builder, a great writer, and a great person who treats those that have worked hard for you with great compliments and sensitivity. Audiogon is lucky to have people like you on their posts.
Thank you!! |
@bigtwin For your platforms you should look into Constrained Layer Damping as a construction method using a Polyurethane as the Damping layer. I use the technique to build speaker cabinets and the result is a quite inert structure. I also make footers using the same method. Message me and I will send you an example. |
Awesome! I like the amount of DIY. At first glance over the photos I thought you built your own electrostatic panels! That’s too much DIY for me. Glad to see you left that to the specialists, although I bow in reverence to those who build their own panels from scratch. I’ve built my own speakers, but not the drivers! That speaker pretty much is one big driver. |
@bigtwin , I'll just bet you really enjoyed making your speaker cables. I made mine years ago from Kimber Kable 12TC which has teflon insulation and 12 conductors woven to prevent induction. Teflon insulation is wonderful in some respects. You can't burn it so you can get slap happy with your soldering iron and not get into trouble but stripping the stuff? I broke my wire stripper and most of my fingernails. Great wire though. It adds up to 8 gauge each leg. I shudder at the thought of having to do it again. I use 4 passive subwoofers and the SLs so I had to make 6 cables. I also use SLs. I have 645-8s which are 8 foot tall 645s. They are 4" narrower and a foot taller than your 745s. There are a few things I would not mind discussing with you. If you are game message me. |