Trans-Fi Terminator Tonearm: 2019 Update


In reading a few related posts on linear tracking tonearm, in general,  and Trans-Fi Terminator , in particular, I thought I would give a brief update of the Terminator.

I purchased the arm directly from Andrey in Moscow two months ago. From what I understand, Andrey has taken over production after Vic's retirement. What I received is the most up-to-date version of the arm with the carbon fibre wand and brass counterweights, the direct wire leads from cartridge to  phono amp, and a new brass manifold ( not evident from the main web-site). Both the wand and the new manifold are Andrey's contribution to the continued refinement of the Terminator.

Also,  please visit this site: https://darklanternforowen.wordpress.com/2017/04/15/terminator-tonearm-new-arm-mount/. This gentlemen from NZ has developed a new arm mount for the Terminator which advanced the arm's sonics even further. It was reading through the the development of this new arm mount that convinced me to order the Terminator after much prior research. I did not purchase the arm mount from NZ as it would not readily fit my Verdier La Platine, instead Andrey made a custom arm mount. It is in essence a two point support mount rather than a single point support rod that is commonly used. 

My previous arm was a SME V of 1990's vintage mounted with a ZYX airy. The Terminator is several notch above the SME V. All the accolades given to the Terminator seem justified. My main point in writing is that the new developments by Andrey, i.e. the carbon fibre wand and the newest brass manifold, seem to improve upon the Terminator even more ( see link above ). This is the news that I wanted to share with existing Terminator owners. I asked Andrey to start a blog on all the new stuff that is happening with the arm, but it seems that he is busy making 'things'!


ledoux1238

@ledoux1238

"You use a junction box to terminate the phono wires from the Terminator. Why don’t you run it direct to the phono stage?"

I used to use one piece cartridge to phono stage leads, but to get them flexible enough for the Terminator travel, meant very thin wire. I was using heavy XLR connectors at the time into a balanced phono stage that was a current rather than voltage amplifier (AQVOX 2Ci). I used to transport the deck to shows and have to set it up after every relocation. After snapping a couple of sets of leads I gave up on that idea. Even the weight of the metal XLR’s was enough to snap the leads.
I now have the short leads from the cartridge soldered direct to some RCA sockets mounted on the back of the arm block, these wires are ultra thin, the jacket on each is only 0.28mm diameter. The new silver interconnects are thicker and go between these RCA’s and my phono stage. This is a much more robust way of doing things and suits my requirements.

I don’t use the Molex connector which allows easy changing of Wand/cartridge, as I only use one set up. This at least removes one set of brushing contacts.

I don’t like the cable Andrey uses or his method of coiling/dressing it. But that’s nothing unusual, I didn’t like Vic’s method either.
I do my own thing and think my method offers less wire resistance or drag. The wire I use is both, lighter and more flexible, so a double whammy. I just ordered some more of this Wand wire, to have on hand, as the only supplier I've come across is in Portugal.

@qwin i too have a transimpedance / current mode phono, Channel D and an extra XLR  cable.  I do have to be careful when handling it. 

Prior to threading the wire through the pivot point, I pass the wire through the next hole closer to the counter weight. I was able to dress the  wire so that it clears the hole as it travels through the manifold. In other words, the wire and arm wand do not interact. I quest I have been forced to work with existing wire though your solution works well. 

I updated my air smoothing tank and its picture but this didn't post well and is not editable so Further explanation is required and a new picture.
I replaced the stock 5L tank with a chain saw plastic fuel can.
This has two compartments, 3L for two stroke Oil and 5L for petrol.
I fed the smaller tank from the pump and put Polystyrene balls in the tank, connected that to the larger tank and added an in-line filter after it all.
The idea of the Polystyrene balls is to create multiple paths of different lengths, with different arrival times. This would hopefully break up the pulses or at least increase the frequency of the pulses. It does seem to smooth the supply and with a quite compact set up.

@qwin Thanks for the update. The polystyrene balls will help in smoothing out the pulses. Another trick is extra long connecting tube, 10m or more. It can be 'coilied' and that helps too. Do you hear better sound quality? I certainly hope so!


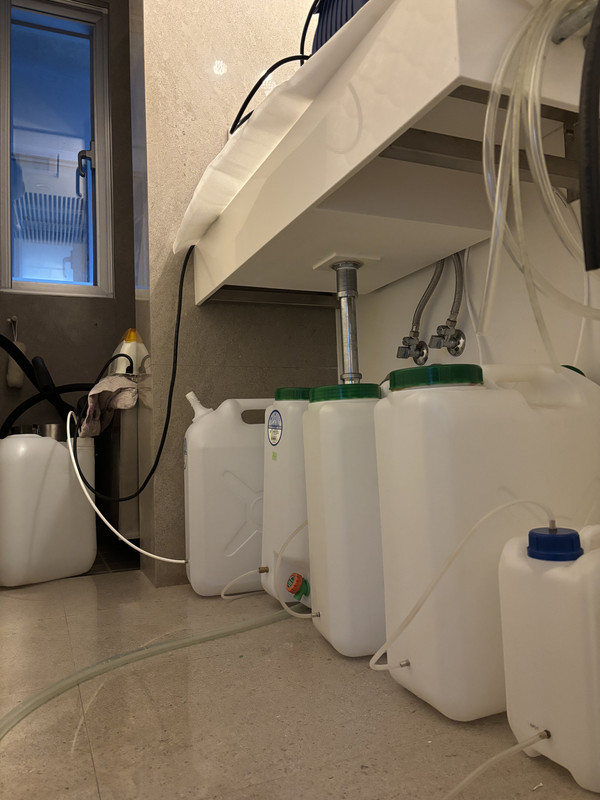
I add a photo of my filtration regiment housed in a unused bathroom next to the listening room and doubles as a record cleaning area. In addition to the original 5L can ( in the fore ground ) which I kept for nostogic reason, the rest are 20L plastic tanks and two 20L stainless steel cans in the back (not shown). There is a total of 150L of filtration connected to a Hilbo 40 knockoff pump. It is not as pretty as I would like it at the moment as tanks are added incrementally. But the idea is to replace all the plastic tanks with SS ones.


Yes, there is a good improvement in sound quality over the stock set up.
Like many people, I don’t have room for a large array of tanks, which is why I made the point, that this solution is compact, so more practical for these users. It’s an alternative solution which opens up some possibilities for folks like me.
My air supply is located in an unused space, behind a door that is always left open, so out of sight, but easy to get at/maintain. Being in a different room, through a brick wall, means I have zero pump noise in my listening room. I may try some different types of solid beads instead of the Polystyrene, to see if they work better, maybe ceramic aquarium filter beads or even dried peas?
Going for a longer flexible hose, usually means a pressure drop/loss so a more powerful pump may be required. Having said that, mine operates in the first third of its adjustment knobs rotation, so I can give it a try.